
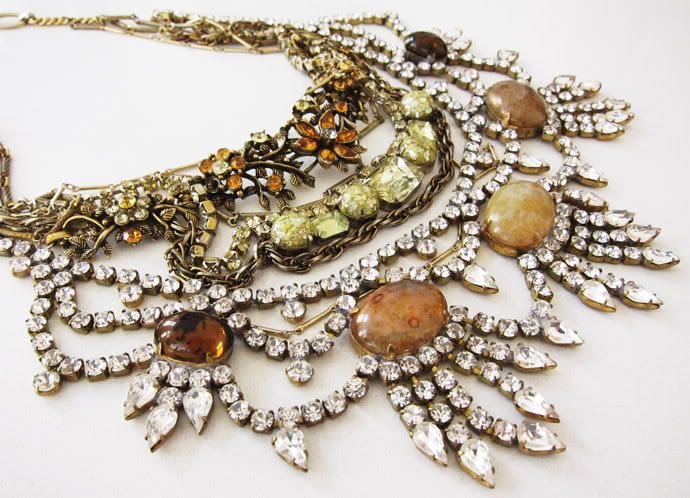
{ above: reworked antique/estate jewels from my private collection }
i love the look of estate jewelry, especially articulated rhinestone pieces that have developed a smokey patina over time (like the yummy stuff above!). unfortunately, such gems can be either hard to find or stunningly expensive. on the other hand, modern replicas may be more affordable, but they often lack a certain depth ~ to my mind, new, too-shiny jewels always look cheap. good thing i've got a trick for faking the estate look!
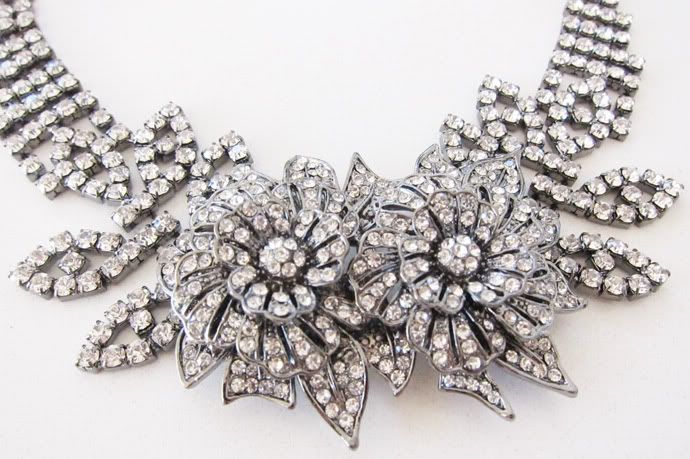
here's what you do: start with a rhinestone necklace (or earrings, bracelet, etc...). recently, i fell in love with this 3D floral stunner while culling pieces for my f21 store. although it's undoubtedly a pretty piece as is, i imagined it might be a bit too glitzy ~ even for my taste! however, i knew it would be perfect for this project.
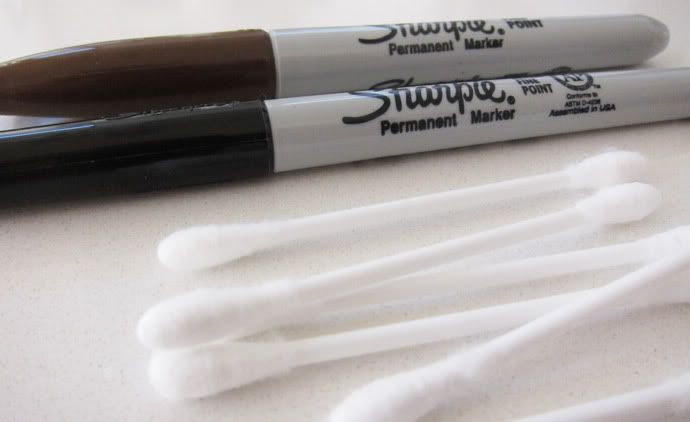
other than that, you'll need:
- paper towels to protect your work surface
- a black AND a brown sharpie pen (fine point is preferred)
- a handful of Q-tips
- nail polish remover (optional)
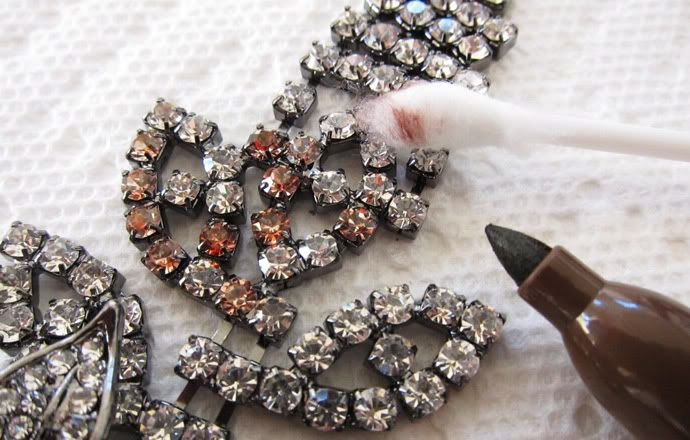
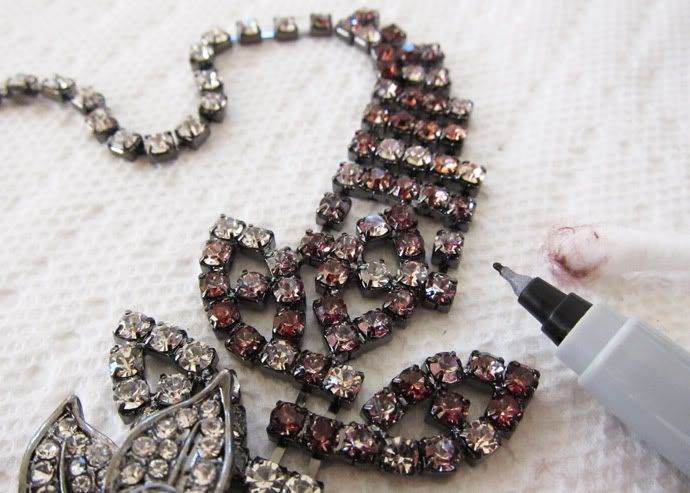
first and foremost, cover your workspace with paper towels; permanent marker does NOT come off tabletops! next, start smudging brown sharpie over the stones; to get that naturally aged look, occasionally skip a stone or two. you want it to look a bit random (as organic aging tends to be). blot the ink up with a moistened Q-tip (dipped in water!) as you go:
next, trace back over the stones with the black sharpie (continuing to blot with damp Q-tips as you move along). layering black over the brown adds dimension, making the stones look more naturally smokey:
for the sake of this tutorial, i completed the right side first, so that you'd be able to compare the desired finish with the original starting place (ie, the left side):
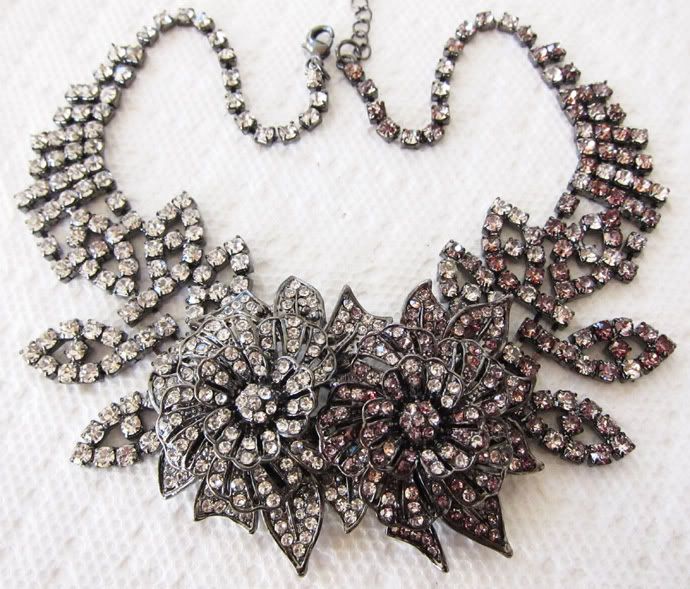
after continuing the same work on said left side, i realized i'd gone a bit too dark overall. that's easy to do ~ but just as easy to fix! simply dip one of your Q-tips in a bit of nail polish remover, and sweep it over the top surface of the stones. use a light touch on this step ~ that will help bring the shine back to the tips of the piece, while maintaining the shading around the sides of the stones. and voila! that's all it takes:
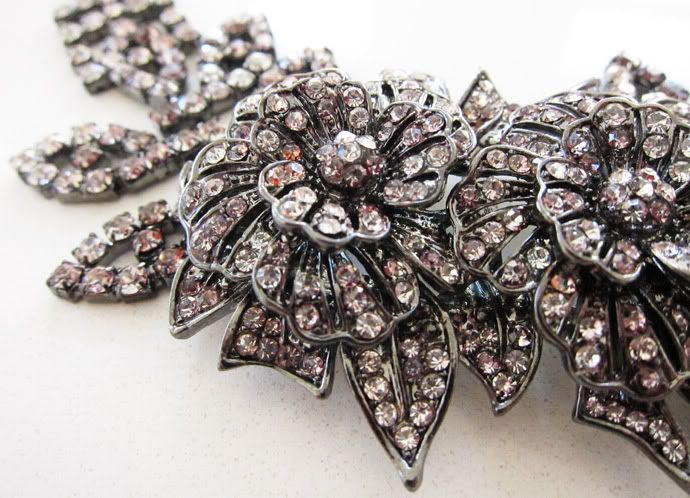
see the difference?! this transformation is definitely (intentionally) subtle; because, as we all know, chic is in the details!
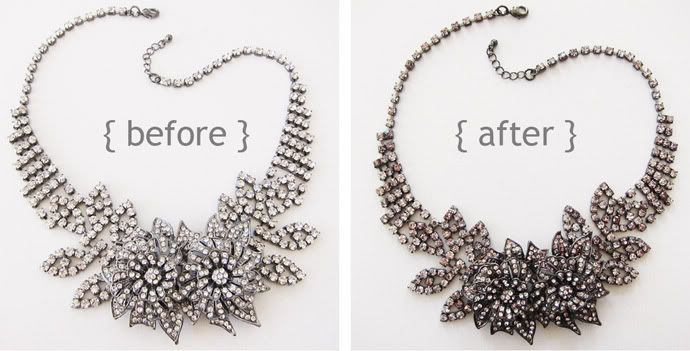
let me know in the comments if you have any questions, and send me pictures if you decide to test this out for yourself!! as always, please keep in mind that you don't have to buy anything new to do this project ~ just dig around in your jewelry box for anything a bit too blingy and try giving it the antique treatment!



144 comments:
That is one of the most brilliant things I've seen! Phenomenal work; I really am stunned! <3
Wow, this is so brilliant! You're amazingly creative. Love this!
http://www.stylethroughhereyes.com
Wow, the results are incredible! Awesome post, thanks for sharing!
I love what you did!
www.FashionSnag.com
this is such a great DIY! i have some earrings that i'm going to try this on! i'll let you know how it goes :)
stayfabulous,
zarna
http://zarnasrunway.blogspot.com
This is absolutely AMAZING! Thank you for this idea, I am going to try it!
XXXO
tastesandstyle.blogspot.com
Brilliant! I can't wait to try this for myself... you're so clever!
xx
Vickie
www.adventuresinfashion.ca
All of my old jewelry was stolen during a burglary, and I miss it so much! This is a fantastic way to make something new look old. Thanks so much. I can't wait to try it out!
So CLEVER! Thanks for sharing!
absolutely fabulous. I agree ...new rhinestone pieces don't even come close to the vintage designs. This, however, is a fantastic way to make them better. And obviously, less cheap looking.
This is incredible. Seriously, I have to try this over the weekend!
Wow I really love this post!! Thanks for showing how to do this! cant wait to try it out ;)
Sarah
theantiquepearl.blogspot.com
thanks for sharing this!will definitely try this.
visit my fashion blog at
http://tiffanyssmallworld.blogspot.com
The reworked jewels are amazing. They remind me of my grandmas old Jewelry. Nice DIY to know though and very very simple. Love it.
Are these the cheap rhinestone necklaces that you can buy in stores like F21?
check out my blog i have a post about these sorts of necklaces!!! Statement necklaces!!!
http://steffanies-style.blogspot.com/
http://steffanies-style.blogspot.com/
http://steffanies-style.blogspot.com/
AMAZING DIY! I'm digging through my jewelry box right now!
http://www.lolodahling.com
Genius and what a simple update for a vintage look! Thanks for sharing!
is this one of the best DIY's I've seen (I'm partial to jewelry ones. I'll definitely email you a picture if I try it out!
lachicmenagerie.blogspot.com
L0VEEEE THIS DIY!!!!!!
GREAT JOB : )
CHECK OUT MY BLOG AND GIVEAWAY!!
http://TheUrbanFlamingo.blogspot.com/
<3
Wow, fabulous idea! I have a necklace that would be perfect to try this technique, but it has both small and very large cheap rhinestones. Do you think this would look as good on large stones?
Really clever manipulation! The result looks awesome. I imagine this working really well with other colors such as a blue and black sharpie for a different effect.
Is the permanent marker truly permanent? I'll have to try a variation of this sometime myself. :)
Wow, this is amazing and so beautiful. I can't believe how good it looks after :) really cool trick, i'll have to try it sometime.
fashionanatomie.blogspot.com
whoa i will definitely try this!
i've been wainting the vintage look for my baubles for the longest time, i even thought of dipping in some kind of acid! the sharpies didn't come to mind 'til this post!
thanks for sharing <3
goldrushh.wordpress.com
Will the color rub off on my clothing when wearing?
I love antiques and antique jewelry as well!
And I so agree!!! CHIC IS definitely IN THE DETAILS!!!
this is so awesome. that necklace is beautiful!!!
Vicky
(new post: Berlin | Secondhandshops & follow me)
fabulouse! i didn t know this works out!
Great tutorial...but I'm such a disaster at doing this kind of things...
eli
www.eli-a-porter.blogspot.com
it's beautiful! thank you for this easy to follow tutorial! i love every post and just would like to tell you - great job! =D
great tutorial! i had no idea something like that could be done so easily.thanks
http://7deadlycyns.blogspot.com/
Brilliant. I shall try myself.
I adore you and your blog, although I never comment because you have so many comments that I always think: she doesn´t need yet another one.
Un abrazo fron Spain.
sacramento
love
http://sheenatschangstyling.blogspot.com/
Love it! I'm definitly going to try it on some of my cheap bracelets that I'm not using ^^,
alex-york.blogspot.com
It is very nice..... you are a very artist!!
wowww that is very creative!!! i love it
your blog is truly inspirational! thanks for sharing =)
wow i never would of thought of this! great!
may even work on fake gold coloured accessories to bring down the fake looking orange tone-def going to try this out!
www.stylewithsarah.com
LOVE LOVE LOVE this!!! Im so going to find a piece to try this out on....thanks!!
Have a Fantastic Day!!!
Statements in Fashion Blog
thank you!!! so many DIYs involve really complicated processes and materials. this one i actually could do right now, without needing to buy anything, or worry about pricking my fingers! thanks so much, can't wait to try it!!!!
Wow, you're so creative! I would have never thought of such idea myself. Great job and I love the necklace, it's stunning!
Loved it!!
This is such a great idea! The "after" necklace looks so much richer. I love reading your DIYs, please keep them coming =)
http://www.crochetclouds.com/
@ Anonymous 1:09: Yes, I bought the necklace for this tutorial at F21. You can always find similar stuff in any high-street store, or inexpensive mall shops like Claire's...
@ Mary Ann: I've tried it with larger stones; the challenge is blending the marker lines so it looks natural. Try it with a larger-tipped marker... But it IS much easier to achieve a seamless effect on smaller stones.
@ tinygalaxies: Yes, the marker is totally permanent! After those first few seconds, it's set in for life!!!
@ Anonymous 2:23: Once the marker dries, it's set. I've never had a problem with it rubbing off on my clothes.
@ Sarah: I've tried it on too-gold pieces, and the challenge is getting a well-blended finish that doesn't look homemade. That's much easier to achieve on small stone pieces.
--
Hope that helps clear up your questions!!!
XOGlamourai
That is genius!! WOW, I never would have thought that a sharpie could work such magic. Thank you for this awesome tutorial!
Now that's my kind of DIY, looks easy enough and there doesn't seem to be any way I can sustain a bizarre injury!
Seriously though, this is super cool! xx
http://idlefascination.blogspot.com/
awesome DIY.
i'm not a huge fan of the gaudy diamonds in mass like that - but with a simple sharpie it really transforms the piece!!
thanks for sharing!
workyourcloset.com
Wow, such an awesome trick...I usually avoid those sort of necklaces because I too think they look too glitzy :) Can't wait to try it out!
XoXo-Kelli K
http://thefashionworshiper.blogspot.com
You are a *genius*! I cannot wait to try this - I have a few pieces at home that I bought (thinking I would wear) and have shied away from because they're just a little... much. I think trying this out will definitely make them a bit more wearable. Thanks for the great tutorial!
PS: Would love to see this necklace in a costume sometime soon :)
The first necklace is so pretty, wauw !
Actually I don't like the result.. it was so stunning before !
Love this!!!!!!!!!!!!
caefernandes.blogspot.com
Brazil
A great idea...reminds me of elementry school when I used to do that to my nails : )
www.plentyforpennies.blogspot.com
Wow, this is a great little tip! Now I am going to try and get my hands on everything in site that needs some work! I am def. going to try this one out, and once I perfect it do it for my blog (I will credit you, obvi)! Thank you :)
www.ladyalamode.com
this is great K! i have tried dipping things at bleach for an aged look, but the results can be unpredictable. this is so much better. one question- does the marker come off easily? could it stain clothing? wondering how careful i'd need to be with the piece after it's finished, because i'm totally trying this tonight. ~joelle
brilliant idea! you have the best DIY tutorials ever!
What a smart and easy thing to do! Thanks so much for sharing it!
Brilliant!! I definitely have some older pieces from when I was into a lot of bling bling that I can use. I think i do like it a bit lighter after the nail polish remover.
www.indramaticfashion.com
wow, you nailed it! Your step-by-step demo is so easy to understand. I can't wait to try, and if I do I will be sure to send in my photo finish. thanks for sharing!!!
Love your work! Did you replace/add the stone cabachons in your reworked vintage? Where do you find all your pieces? Especially your large pendants...love, love your work! =)
this is one of the best DYI's I've seen! great idea!!!
kristin
electric fringe
Totally going to F21 the first chance I get. Perfect for a wedding i'm attending next weekend!
This is wise, the piece looked completely different!You really remind me I should have a look at my messy jewelery box and try to renew some of them.
Thanks for sharing!
http://lovedecoo.blogspot.com/
wow such an amazing idea, i never would have thought of it!
Wow that is so cool, such a good idea!!!!
Great idea. I imagine one could have all sorts of color play fun with this method, not only the tawny patina effect.
oh, wow, this turned out gorge, thanks for the tip
vasilieva
http://elenavasilieva.blogspot.com/
x
Great idea Kelly! I love it and will have to try it soon.
Incredible transformation! I was recently looking for some bling to jazz things up and most of the stuff I saw was too bright and looked too cheap. This is a great fix--thanks for the tip!
Oh wow! What a difference! It is incredible how much more polished it looks after.
Omigosh! What a fantastic idea! I know exactly what you mean about newer rhinestone jewelry being too "blingy". Up until now, I just didn't buy it. You've just opened up a whole new world for me. Thanks! Will definitely have photos to share soon.
Kendra
http://closetconfections.com
I LOVE this and will definitely try it out! So clever ;o)
genius! i kind of liked the half done pic - a nice ombre-effect. i might try that. thanks for the how-to! xx
That really works!Thanks for sharing,great blog and following u!
http://fashiondoseblog.blogspot.com/
I can't believe it.. Is it really so simple? Looks amazing ~
OMG!!! such a great necklace!!!
http://silkmirror.blogspot.com/
Brilliant!! I love to rework old jewelry & will definatly try this. Simply amazing
this is kind of brilliant beyond brilliant! i love the original but i never knew you could make it more awesome! thanks for the tip!
xx,
tara
www.thewondergirl.com
Love this! I always love going antique shopping & finding these cute vintage pieces too!
Check out these chic selections of FALL'S HOTTEST HANDBAGS! You'll love them!
http://www.honeysucklechic.com/2010/09/21/falls-hottest-handbags/
Ashley
http://honeysucklechic.com.
This is one of those diy's I will never forget. Thank you for sharing!
http://behindthelashes.com
Fantastic idea. I love the way this turned out.
very cool!
http://verychiclist.blogspot.com/
I loooove this! What a fabulous idea!
http://muvement.blogspot.com
This is awesome! I hate it when some jewellery is too "bling bling" so this a perfect fix.
www.theafeminada.blogspot.com
Love it!!!! xoxoxo
Jugo
www.jugoandhugo.blogspot.com
This yewelry is amazing! Your blog too ;) love it..
xo,
Carolina
I love them both ways, it's a shame you don't have two :-)
Fabulous idea!! I discover your blog only from few days and I love it, you have a wonderful style!
Come to see my blog!
http://tonbonblog.blogspot.com
wow this is amazing! Can't wait to try it!
that is super creative!! thanks for sharing this : )
Um, this is so genius! Amazing. Loving the idea of doing this cheaply and quickly. XO Valerie
www.imstarvin.blogspot.com
I missed your diy posts!!it´s such a great idea!I´ll try it.
http://maiubcn.blogspot.com/
wow amazing DIY! Love your blog stop by mine if you have time
www.mystreetsweets.com
thanks kelly for sharing lovin it!!
http://www.ohmydior.org/
that's totally amazing!! I fell in love with the necklace.. and I have to try it!
http://sweetlittleconfessions.blogspot.com/
You are so creative!
Love the post, as always
http://daswhatshesaid.blogspot.com/
this is awesome! i'm going to try it out :)
Great work :) very smart!
This is brilliant! How did I never think of this before?
Will have to try soon,
Thank you so much!
What a great idea - thanks for sharing! Will definitely give it a try.
I absolutely adore your blog site! Tks for sharing =)
www.fotosandfashion.blogspot.com
OMG brilliant!!! I search high and low for vintage rhinestones.. i love when they turn a greyish yellow.. it just looks so much better! anyway i have tried to 'age' them myself and NEVER thought of this.. thank you so much. def going to test this out myself!
WOW what a difference just a sharpie makes...
jen
http://blankwhiteframes.blogspot.com
WOW, this is a astounding idea!!!
NICE! I have a few pieces I'd like to try this on...
LOve you Idea,thanks for sharing
Follow from Bangkok Thailand
This is a great idea really well executed! I also hate it when things are too blingy and new looking... will have to try this!
GIVEAWAY on Ruby Slipper Journeys!
Wow! You are brillant!!!Love your blog! Beautiful...
Aloha from Maui :-)
I freaking love it! such a simple idea yet the effect is stunning. now I'm sorry I didn't buy a pair of cute earrings cause they were too blingy.
The fact that you can come up with simple solutions like these is just crazy....respect girl, respect!!!!!
miss scarlet
www.cluecult.com
That is absolutely incredible.
It is crazy how you even came up with this idea! You are so creative...truly admire you. You have a talent, darling.
www.fashion-feline.blogspot.com
Best DIY ever! I've always wanted to wear jewels but I don't like the over the top glitz and I've always wondered what I could do to make it more antique. Now I know! Thanks, Glamourai!
saw that necklace on the forever 21 site and liked it.. but wow what you did with it, it looks gorgeous!
AMAZING DYI IDEA, AS ALWAYS YOU ARE THE BEST.
One question though...
When you say "blot the ink up with a MOISTENED Q TIP! does this mean damped/moist with water or the nail polish remover?
Have you tried with a grey Sharpie to make it more smokey?
Thanks for your response.
Cheers!
Oh!So beautiful! Great idea!!
I hope you like my new blog!
See u!
http://doityoursales.blogspot.com/
I love this thank you for sharing.
Great idea! I love it.
www.shevahh.blogspot.com
Wonderful, genius idea! I'm going to try this out on a couple of overly-shiny brooches that have been sitting at the bottom of my jewelry drawer.
www.1sweetlemon.blogspot.com
wow, gorgeous pieces! Great tutorial. Thanks for posting!
http://quenchfab.blogspot.com
ethanol also works if you don't want to breathe in nailpolish remover
Brilliant!!! I have some old 'brides maid jewels' that will benefit from this! xo! Lu
I'm totally going to try this!! I love it
This is a proverbial work! Very impressive! Thanks for sharing. I never thought this can be done until you shared.
What a great idea! I would have never thought of that. And I like the finished product better than the original.
OMG!!! I just purchased the same exact piece. It caught my eye and I had to have it!!! but the one thing I said was "how often am I truly going to wear this" and Miss Glamourai answered my question without knowing it. I am going to try this genius idea and I will truly send you a photo..keep your fingers crossed for me.
Thank you, your blog, your style, everything just wonderful!!!
I wanna see what it looks like on you!
WEAAAAR IT!
@ esclava de la pluma: MOISTENED Q-TIP = dipped in water. I'm sorry for not being more specific about that (I've since gone in and adjusted the post to be more clear).
Haven't tried it with a grey sharpie, but I imagine it would work beautifully!
XOGlamourai
best diy ever -- how brilliant! the result is beautiful
xo
a fantastic idea! you and your blog are pricless! i am now following!
Hello, I loved this so much I tried it myself. Thanks for such great content and creative ideas. You can see pictures of my piece on my blog http://msbchic.blogspot.com/.
-MSB
I am definitely trying this very soon! Great job!
This looks amazing!!!<3
wow how cool is that?! I'd never think to do that yet I could totally pull it off and I truely thought the starting piece was tacky yet the end result is awesome! Love it and your craftiness!
Thanks SO much for the tutorial!
xo,
C
this is incredible
omg 22389472873x better!
this is the best diy post i have seen in ages. thank you for sharing!
Is it ok to wait for you to do another great job on a faux pearl jewelry? I have this huge pearl necklace with a huge flower too but I did not wear coz it's not just the shade and look I want. You're right, sometimes, they just look outright cheap. So I will just wait patiently when you are going to post a work on faux pearls. Thank you so much. I love your ideas so much!
Brilliant! I usually shy away from buying super shiny jewels even if I'm in love with the design but now with your tip I'm definitely not going to reject any favored piece.
http://fashionnostalgia.blogspot.com/
Love your DIY post!!! I was inspired by you to try the technique out myself. I used alcohol inks in place of the sharpie markers for a '50s pastel rhinestone color look & blogged my results with a shout-out to you for your awesome tutorial!
http://jrose-studio.blogspot.com/2010/10/diy-color-my-rhinestone-world.html
Oh what a great idea! I never would have thought of that!!!
Wow, I just ordered this exact necklace from Forever21 and I like it, but I myself thought it was a bit to bright as well. I am going to try this! Great work!
What a creative idea! I must try this immediately; thanks for sharing.
hm, michelle phan's youtube channel just posted a video with the same idea. i wonder if she got it from your blog...?
Brilliant dear, I can't wait to give this a try!
I absolutely had to share it with my readers, thanks for the great DIY!
http://founditmadeit.blogspot.com/2011/04/happy-april-tutorial-roundup.html
this is absolutely brilliant. what a fan-freaking-tastic idea.
Post a Comment